Tuesday, December 28, 2010

Four Intersecting Triangles no.3

Here is my third set of four intersecting triangles out of beads, slightly different from the first two sets.  Each triangle uses a different color seed bead on the edges, but all of the corners are matching black with a transparent red glass.  Two of the seed bead colors are the new snazzy marbled seed beads, including gilded black and gilded red.  I love the texture and richness that the speckled gold finish gives.  This piece is composed of 564 beads, and it measures just over an inch across at its longest diameter.  You can find this beaded math sculpture in my Etsy shop.

Monday, November 29, 2010

Felt Cuffs for Pixies and Other Creatures

I've been having a good time making felt cuffs lately, a good remedy for cold winter hands. 

Textile Cuff Bracelets XVIII Redwood Green Nymph Nuno Wet Felt with Merino Wool Silk and Metal Snaps

My favorite colors of all are the greens found in nature.  This pair of beaded felt cuffs use all of those leafy greens, with little bits of woody browns.  I even added little brown bugle beads to the bead embroidery, which remind me of broken branches.

Textile Cuff Bracelets XVII Black Purple Cranberry Nuno Wet Felt with Merino Wool Silk and Metal Snaps
These are all of the colors my sister loves, purple, cranberry, grape, wine, with a black border.
Textile Cuff Bracelets XV Distressed Black Blue Aqua Nuno Wet Felt with Merino Wool Silk and Metal Snaps

Textile Cuff Bracelets XIIII Distressed Black Purple Nuno Wet Felt with Merino Wool Silk and Metal Snaps

These four pairs for sale in my Etsy shop, gwenbeads. Click on the links to see more photos an read more about them.

Saturday, November 27, 2010

2011 Mathematical Art Gallery

A set of 12 of my beaded beads were selected for the 2011 Exhibition of Mathematical Art at this year's Joint Mathematics Meeting.  I call the set "Blue Ionic Polyhedra: 12 Beaded Beads in Two Sizes."
I wrote a pattern so that you can learn to weave own beaded Ionic Polyedra.  The pattern includes information on all of these (and other) beaded beads except the rhombic dodecahedron.

Friday, November 12, 2010

Four Intersecting Triangles and a Pair of Ionic Cube Earrings

I made another set of four intersecting triangles, this time, with my own beaded triangle design.  This piece is tiny, measuring just over an inch across.
I also listed a new pair of silvery Mini Ionic Cube Earrings
Both of these are for sale in my Etsy shop.  Click the links above to read more information about these pieces and see more photos. 

Monday, November 1, 2010

Two Tone Faux Fur Playa Coat

Here's my latest faux fur coat, in deep purple and black.  I started with McCalls pattern 5092 (medium), but I altered it enough that I'm not sure you'd consider it the same pattern anymore.  
The purple is much deeper and richer in person; my camera just can't seem to photograph this color right!  It's got two pockets, a wide hood, and two pairs of hooks to clasp the front.  It's fully lined in black and oh-so comfy and warm.  The cut is a full swing coat with dolman sleeves.  Because I designed the hood from scratch, I had to cut the hood three times before I was happy with it.  The first hood was totally the wrong shape and the nap was going straight down which made it look funny in the front.  The second one, I fixed the shape, and I cut it with the nap pointing straight back, which created this funny duck-butt looking seam in the back.  The third time, I finally got the right shape and the nap going down and back diagonally. 
I also sewed the hem twice to get it to drape properly, but in the end, it turned out just as I envisioned it.  I'm shipping it out to it's new owner today.

More Ionic Polyhedra

I listed two beaded beads in my Etsy Shop.
Ionic Octahedron
This one is in nice earthy metallic colors with watery green Swarovski crystals sparkling on the inside.
Ionic Cube 
I especially like this first view of the cube because you can see right through two of the holes.

Thursday, October 28, 2010

New Kits - Ionic Polyhedra

We released a new kit today for the Ionic Polyhedra.
Here's a photo showing just one of the possible combination of beaded beads you can make from the kit.
The kit includes enough beads to make one regular sized Ionic Cube or Ionic Octahedron, plus four mini cubes or octahedrons.  Or, if you'd rather, you can use the smaller beads to make two antiprisms, two cuboctahedrons, or two rhombic dodecahedrons. The mixed metal combination of bead in this kit is one of my all-time favorites.

Tuesday, October 26, 2010

Felt Cuffs XII and XIII

Textile Cuff Bracelet XIII - Twilight in Gray Purple Nuno Felt with Silk 


 I finished a few new cuffs yesterday and listed them in my Etsy shop. The one above started as a pair, in purple and white wool (and other fibers) felted over hot pink silk fabric. When I wet felted them, the hot pink ran and dyed the white a very faint pink.  I really didn't like the colors, so I cut one up as an experiment.  This week, I got some black acid dye, so I was able to overdye the remaining one to make the pink into a nice middle gray.  Then I beaded it using freeform bead embroidery, following the lines in the felt.  I added snaps and a tag and called it done.

Textile Cuff Bracelets XII - Running Water in Lime Green Blue Aqua Nuno Felt with Silk 


Click the titles to see more photos and read more details.

Thursday, October 7, 2010

New Kits - Kepler's Star and More

We have some new kits available at beAd Infinitum.

Kepler's Star Bracelet
The silvery seed beads in this bracelet are some of my all-time favorite beads.  There are also some purple beads in here that glow like dichroic glass.  You can make this bracelet in a length that fits you.
Ionic Polyhedra
The kit makes two beaded beads in these two color schemes.  You can make two cubes, two octahedrons, or one of each, like I did.
Blue Velvet Rosebuds
This is an older kit that we finally restocked.  I like the contrast of the rich matte blues with the shiny gold.  The kit makes 3 beaded beads and matches our Blue Velvet Four of Spades kits.  So, if you buy both kits, you can make a two-tiered pendant and matching earrings.

Monday, October 4, 2010

Earrings and Beaded Beads

I started weaving beads in 2004, and in that time I have made more jewelry and beaded beads than I remember.  I have sold and given away most of it, I think, but I have also been hoarding some pieces, not to wear, but just because I like looking at them in my bead box.  I am trying to get some of them listed in my Etsy shop and set them free.  Sometimes it's hard to let your art go, but I'm working on it.  Here are three new listings in my my Etsy shop.

Three Drop Earrings
I made this pair of Three Drop Earrings in 2006.  I wore them once, but I didn't like the earwires I used.  Today I exchanged the old ear wires to a pair I made more recently, and now they are finally done.
Mini Infinity Dodecahedra
I happened upon the Infinity Dodecahedron weave in 2005 as a result of studying the bead work of Laura Shea.  We met in 2004 at a Bridges conference in Banff, Canada. Laura was kind enough to allow me to take some photos of her beaded beads, and in her work, I recognized the potential of applying the mathematics of polyhedra to the art of bead weaving.  The Infinity Dodecahedron was a consequence of my seeing Laura's work.  I made these beaded beads in 2008.
Mini Ionic Cube Earrings
These earrings are new as of last night.  These feature miniature Ionic Cubes in colors for fall.  I love the these color together, leaf and earth, the colors of the forest.  Nature makes good color schemes.

Sunday, October 3, 2010

Intersecting Links in Bead Weaving

Years ago, I'm not sure when, I learned about this configuration of three links is know as the Borromean rings (or Borromean link),  I remember drawing doodles of this three-dimensional shape when I got bored with my professor's lectures.
In 2005, I learned how to weave seed beads with box stitch (e.g., three-dimensional right angle weave), the link was a natural design for me to weave because I had drawn it so many times.  I made each rectangle with different colors of seed beads, but the rectangles are all the same size and shape, each measuring 27mm by 18mm by 7mm.

 I find the Borromean link is particularly interesting because all three links are collectively linked despite the fact that no two of them are linked to each other.  To emphasize this, I left the dark link open so that you can take the three rectangles apart and put them back together again. 

This piece was featured in my 2007 paper, "Three-dimensional finite point groups and the symmetry of beaded beads" (pdf) as and representation of the pyritohedral symmetry group Th. Personally, I remeber this symmetry type as "gift package" as I like to think of it as a the same symmetry as a cube box wrapped with 3 pieces of ribbon.  This Beaded Borromean Link is sold, but if you would like to learn how to make one for yourself, check out the pattern and kits for the beaded Borromean Links

Several years ago, I had the honor of hearing George Hart give a talk on Orderly Tangles.  He presented this talk at in Banff, Canada in 2005 at a math and art conference dedicted to H.S.M. Coxeter.  (Coxeter was a mathematician, particularly interested in geometry, whose work inspired the great mathematical graphic artists M.C. Escher in the 1950s.)  Five years later, I find that Hart's talk was one of the most memorable talks from that conference, at least for me it was.

Hart writes, "In the 1970s and 1980s Alan Holden described symmetric arrangements of linked polygons which he called regular polylinks and constructed many cardboard and stick models. The fundamental geometric idea of symmetrically rotating and translating the faces of a Platonic solid is applicable to both sculpture and puzzles." Listeneing to Hart's talk, I learned about new ways of linking polygons.  The result is this set of four linked equilateral triangles. Each triangle is a different shade of green, and they all have matching corners in shiny copper.


The design for the bead woven triangle was origianlly published by Phyllis Dintenfass in Beadwork magazine, in the Dec 08/Jan 09 issue.  It was republished in the special issue called, "Beadwork presents Favorite Bead Stitches" published July 2010.
Once I saw Dintentfass' triangle pattern, I knew immediately that I had to use it to make an orderly tangle.  I had been wanting to bead this tangle for a couple of years, and I was thrilled when I found the perfect bead weave to make it.  (It's been sitting in my seed bead box for a year and a half, and I finally got around to photographing it.)  The edge of each triangle is 42mm and the complete tangle measures 48mm at its longest.   This beaded link is sold.

Tuesday, September 28, 2010

Ionic Rhombic Dodecahedron and Cuboctahedron

Here is my latest beaded bead using my Ionic Polyhedra weave.  This one is based upon the rhombic dodecahedron.  It is 33 mm wide and composed of over 600 beads.  I am happy with the way it came out because it is reasonably stiff and very hollow.  Because it is so hollow and the holes are so large, my boyfriend says it looks like a geode.  I like the way you can see all the way through 4 different holes simultaniously.  The first photo shows this.

The second photo shows a different type of hole in this beaded bead. 
After I took these photos, I found another way to hold it that shows two holes.  In this view below, the large purple crystals in the back show through the holes in the front, falsely making the beaded bead appear solid.

The rhombic dodecahedron is the dual of the cuboctahedron.  Below I show the dual correspondence between these two polyhedra, using my Mini Ionic Polyhedra weave.    I tried to pose the pair of beaded beads so that little gold beads have the same configuration in each photo. 

The cuboctahedron is on the left and the rhombic dodecahedron is on the right. Because they are duals of one another, one has faces where the other has corners.  In terms of beaded beads, one has holes where the other has stars of seed beads. 
These two little beaded beads are just two centimeters wide, and they are each composed of exactly 288 beads.

Monday, September 27, 2010

Design Team Call for Seed Beaders

Are you a seed bead weaver?
Do you want to get free patterns from beAd Infinitum?
Do you want a this fancy banner to adorn your blog or website?
Florence and I just put out a call for talented seed beaders who would like to join our design team. Team members get free beAd Infinitum patterns of their choice, each month of the term. In return, team members make and publicly display jewelry on the internet using our patterns.

See all the details here:
beAd Infinitum Design Team Call
Deadline for submissions:  Sunday, October 24, 2010.

Wednesday, September 22, 2010

Ionic Polyhedra Beaded Beads

Both photos above show the Ionic Antiprism.    Even with that large hole, it still holds its shape.

My beading buddy 
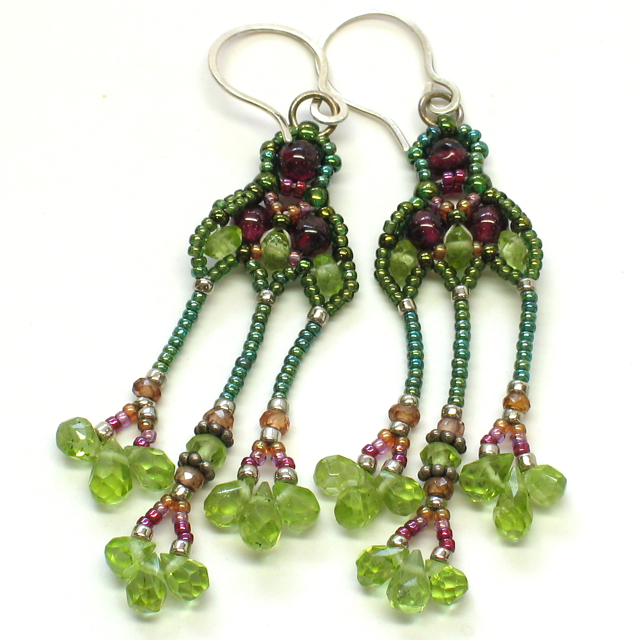
Florence and I have been playing around with herringbone stitch for a couple years now, with a recent focus on herringbone cables with just 3 beads per round.  We like the 3 bead version because you get a narrow cable that has enough detail to be decorative, but it doesn't take too much time to weave.

At beAd Infinitum today, we released our newest pattern for weaving beaded beads, the 
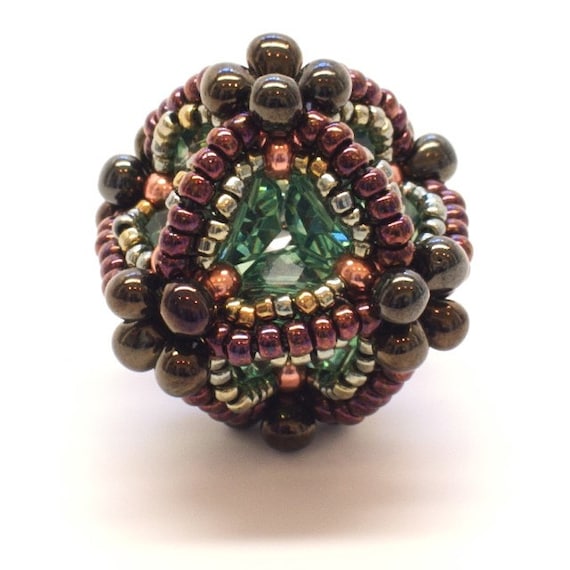
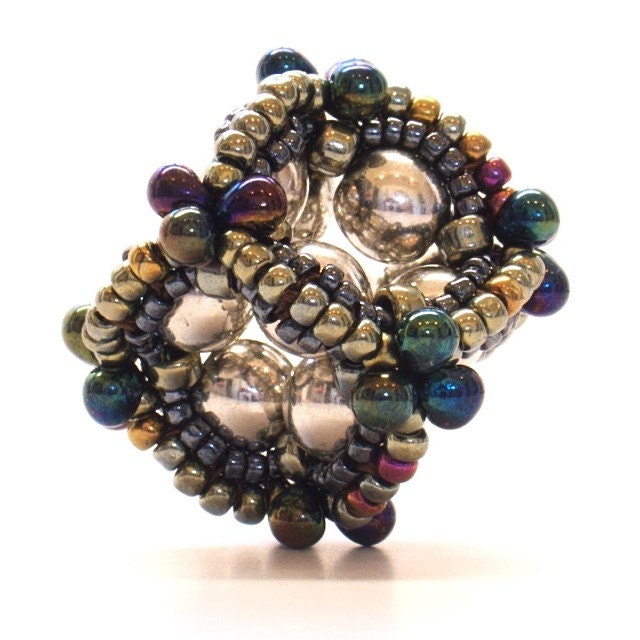
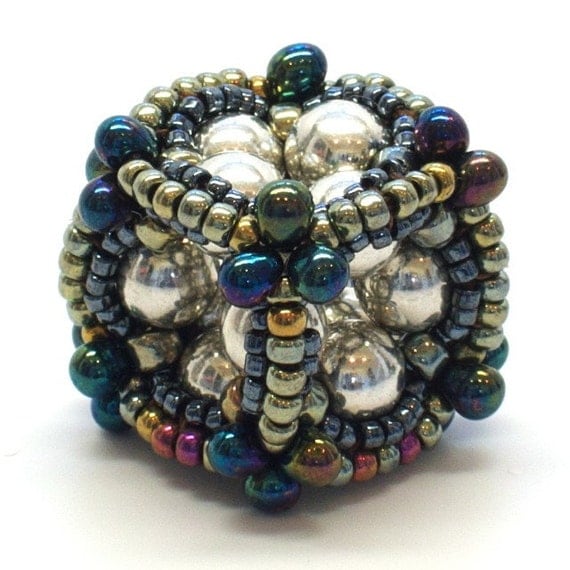
Ionic Polyhedra using a curved version of the herringbone 3-cable.  The idea for the Ionic Polyhedra was based upon a beaded cube that Florence made first.  Florence sent me a photo of her beaded cube, and when I beaded copies, the two in the above photo (center and right), I refined her design to make the beads fit together snugly, and I added some tiny drop embellishments.  The resulting columns of beads remind me of Ionic columns from ancient Greek buildings.  So I named the technique "Ionic," and I began applying it to a wide variety of different geometric objects, like the octahedron shown above (left).

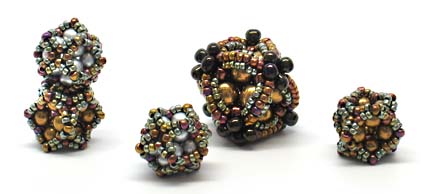
I started writing this pattern back in April, and I just finished adding the reviewers comments today. (Thank you Florence and Cindy!)  To date, this is the longest beading pattern I have ever written, 24 jam-packed pages, with over 90 illustrations and photographs.   I was surprised and happy to find out how many different polyhedra look good as Ionic Polyhedra beaded beads, so I kept weaving more and more different shapes with this technique.   The pattern is so long because I wanted to include all of the different designs.  In particular, I used seven different geometric objects to weave beaded beads in each of two sizes, for a total of 14 different beaded bead designs. I'm sure there are other beautiful Ionic Polyhedra, but at some point I had to declare the pattern finished.

I wrote and illustrated detailed instructions for the cube and octahedron (see above photo) with advanced-beginning bead weavers in mind.  This part of the pattern includes every relevant detail I could think of, including some of the underlying mathematics.  For more advanced weavers, I include lengthy descriptions of how to create other shapes using this technique (including those shown here) and a three page spread showing the steps for an Ionic Icosahedron. A handy table includes seven different geometric objects that I use to design beaded beads, and I include detailed photographs and written explanations describing them all, including bead counts and sizes so you can make them all yourself.

The pattern ends with photos and a discussion for making Mini Ionic Polyhedra, some of which are small enough for light earrings. Finished bead sizes range from 11mm for the Mini Ionic Cube, all the way to 40mm for the Ionic Icosahedron, and everything in between.
I think the Ionic Pentacluster above looks like a frilly spaceship. 
Check out the Ionic Polyhedra to see links to more photos or purchase the pattern.

You can read what Florence has to say about the Ionic Polyehdra on her blog.

Friday, September 17, 2010

Cindy's New Ballon Box Pattern

Several months ago, Florence Turnour and I decided to invite, Cindy Holsclaw (also known as beadorigami) to feature some of her beaded bead patterns on our website, beAd Infinitum.  We found her beaded bead designs to be innovative, beautiful, and well designed, so we were obviously thrilled when she decided to join us.  Today, we are releasing her newest pattern, the Balloon Box.

I made a Ballon Box while I was reviewing her pattern, and I must say, they are very satisfying to weave.  They are wonderfully tactile since they are a wee bit of squishy, yet they always spring back into place. I'm completely fascinated at how the Balloon Box looks with pearls and metallic seed beads.  Cindy, you found a beautiful way to update the pearl necklace!

MAA Poster

Here's the poster announcing an upcoming meeting for the Mathematical Association of America.  It has my bead work on it.  The bracelet is the Night Sky weave, and the beaded bead is from my soon-to-be-released Ionic Polyhedra pattern.

Sunday, August 8, 2010

Fuzzy Hoodie Suit with Ears Horns and Tail

I just finished my first full body suit.  It's made out of faux fur with a polyester cuddle fabric lining. With all of its furry goodness, it reminds me of a cross between an abominable snowman costume and something from "Where the Wild Things Are." It has a hoodie-type hood with horns and ears.   This was a commissioned piece, completely made to order.

I started with a muslin mock up made from Simplicity Pattern 2853, size small, plus I added a two piece hood.   I also lengthened the sleeves and pants to be too long for the fitting.  My client and I arranged for a fitting of the mock up.  With him dressed in the muslin suit, inside out, I added a bunch of safety pins to fit the suit to his build.  I pinned the cuffs and pant hems, I took in the width of legs significantly, and also in the hips, waist and a little in the chest.  I drew on the placement of the side seam pockets and the inside patch pockets exactly where he wanted them.  I also marked where the bottom of the opening should start.  Then he got out of the suit, and I penciled where the seam should be as identified by the pins, removed the pins, ripped the muslin apart into its component pieces, transferred the markings to the paper pattern, added seam allowances back in, and my pattern was ready to go.

With the pattern in hand, I cut out the lining and fake fur, trimmed all of the fur out of the seam allowances, and serged all of the pieces including the lining.  I sewed the fur pieces together and all of the lining pieces together.  Then I added ears, horns, and a tail.
Normally, with a fur coat, I machine sew the lining to the fur, right sides together, up one side of the front lapel, across the shoulders, and down the other side.  This leaves just the bottom hems and cuffs to finish by hand.  However, because the particularities of this suit, I decided to finish everything entirely by hand.  It's more work, but I have much more control when hand sewing, so I could finish all of the corners neatly.  Adding the lining by hand required that I cross stitch all of the hems of the fur around both cuffs, pant hems, and the whole front opening (including hood).  You can see the cross stitching in many of the photos below.  I also added five extra-large hook and eye clasps along the front opening. It took me a few tries to figure out a good way to start adding the hooks, but if you look at the photo below, you can see the first two stitches that are adequate to anchor the hook efficiently.
Here's what a hook looks like after it's sewn, before it's covered with the lining.
I was worried that the fabric would rip at the bottom of the front opening, so I added a patch of flannel (it matches the pockets) with multiple rows of stitching across its width, an a tons of knots.

I also cross stitched down the seam allowance where the hood meets the neckline, under the arm pits, and at the crotch.  I did this to reduce bulk.  This photo shows an armpit.

Then, I added the lining.  In addition to stitching all around the openings, I also tacked the lining to the fur in the bottom third of the arm hole seam, on the crotch seams, and where the hood meets the neckline.  I added my tag and it's done!  Here you can see where the lining meets the fur at the front opening.

Today, the suit's new owner came over to try it on and he let me take photos.  Yeah.  We were both very happy with the fit, and he was amazed that the seams blended right in.  He couldn't even feel them.  I really enjoyed this project and we are both super happy with the results.  I put a little piece of my heart and my best workmanship skills into making this suit, inspired by the vision and enthusiasm of my client.  I joked that it's industrial strength, a family heirloom, so he can stay warm on the Playa at Burning Man, in his new fuzzy suit for many, many years to come.
Related Posts Plugin for WordPress, Blogger...