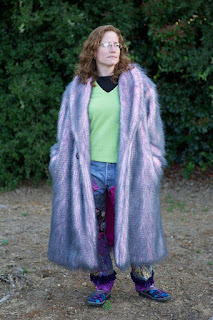
 This coat has awesomeness written all over it. What's not to love about pink faux fur and pure silk lining? This was made with McCalls pattern 5092 (medium) but it is a different pattern in the same envelope as compared with the other coats I've shown on my blog. Like with the other pattern, my muslin sample proved to be way, way too big for me. In the Playa spirit, I wanted to make it a one-size-fits-all. So I made it smaller and now it's still big on me, but wearable by most. I made some adjustments to the sleeves: First I narrowed them so that you can wear a back pack. I also made them longer, long enough to cuff. Since the top of the sleeve was way down my shoulder, I also narrowed the entire coat by folding the pattern pieces all the way from the shoulder to the hem. This moved each sleeve cap one inch closer to the neck (another reason I had to lengthen the sleeve), and removed 4 inches around the waist and hem. It still has a drop shoulder. I also lengthened the pattern from a jacket to a coat.
The only lining fabrics I had in my stash that coordinated with the fur were not large enough for the whole coat. So I made a patchwork lining with patch pockets. I bought the two swirly, dotty silks years ago in the fabric district of Philadelphia, and they are fabulously thick. For this coat, I united them with the plain fuchsia silk, and to my delight, the fucshias match perfectly.
Three playa coats done, and I've been learning a lot from making these coats. In retrospect, I learned a few more things from the Blue Coat that I incorporated in this pink one. I found that I prefer cotton flannel for the side seam pockets. It's heavier than silk so it will keep your hands warmer, and it's more durable.
I learned that you need to completely sew the lining together, including all pocket details, before attaching the lining to the coat. I managed to create the crookedest pocket in the world on the blue coat, which I ripped and resewed by hand.
I learned that making buttonholes on my sewing machine isn't as scary as I think it is, at least not on the silk pocket flaps it wasn't. In the front of the coat, things are different. Having to cut a hole right in the center front of my work can be a bit debilitating. I tend to procrastinate that step and switch to other projects.
The Blue Coat is the only one with button holes through the fur. I learned that making buttonholes on fake fur is still tricky. I had to cover both sides of the furry lapel with tracing paper in order to get the lapel through the sewing machine. Without the paper, the fur gets caught in the bobbin case and everywhere. Bad bad! Also, if my buttons are too big, my automatic buttonholer doesn't make big button holes and I'm on my own. I have to make the button holes manually. In the end, to make large button holes in fur, I used my machine to straight stitched around the button holes, I cut them open with a seam ripper, and then finished them by hand with a knotted button hole stitch in thick pearl cotton. Functional, looks nice. However, my fear of buttonholes in fur overtook me for the pink coat here. So I used a really thick new hair tie as a loop instead. For me, sewing a loop on the front is much easier that cutting a hole.
I learned from my brother that this faux fur is actually a faux feather. The original is used in tying flies like the Grissly King wet fly.
This pink coat is SOLD. Thanks Jim.

