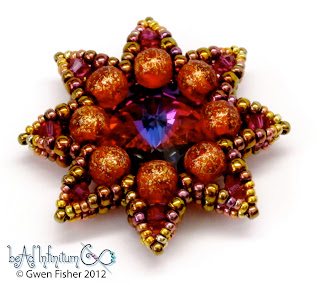
We just got word... Florence Turnour and I will be teaching two classes together at the Bead & Button Show in June 2013. Here are a couple photos from the workshop I designed. First is an 8-pointed star.
And here is a necklace that I made from 6-pointed stars in four sizes.
I call the workshop the "Starburst Galaxy Made With Right Angle Weave." I call it a galaxy because you can make more than 20 different stars in different shapes and sizes, all with one combination of techniques. I'll show you more photos of the different stars you can make in the coming months as I assemble kits. Here are the class details. B130411- Tue. June 4 - 9:00am-5:30pm (with 1.5 hr. break) - DC Show Floor 22. Registration doesn't begin until January, I think. I'll give you more info as I get it.
Red, it's one of those colors that I generally don't like much. For once, I was truly inspired by red, and with turquoise no less!
I was inspired to use this color combination from the bracelet shown
below. This bracelet was designed and beaded by the very talented Mikki Ferugiaro (photo used with permission). Thank you, Mikki, for the great color scheme and the inspiration! You actually made me like red, and that's no small accomplishment.
Here's another close up of the earrings.
Do they look huge? Last time I saw Florence in person, I was wearing my own Mini Blueberry Beaded Bead earrings (in purple and green), and she was very surprised by how small and dainty they are. She had seen photos on line, and she always imagined them to be much larger than they really are. Mini Blueberry Beaded Beads measure just 11 mm in diameter. In my book, that definitely qualifies them as minis. See how small...
While I had these seed beads out, I made a second Highly Unlikey Square pendant that matches the first, but with green instead of red. What can I say? My love for red is fickle, and by now, you know how I feel about green. At the same time, I actually like all colors (except yellow) because I've learned that any color can be beautiful if it's used well with other colors, even red. Now, if I can just figure out how to love yellow, I'll be set.
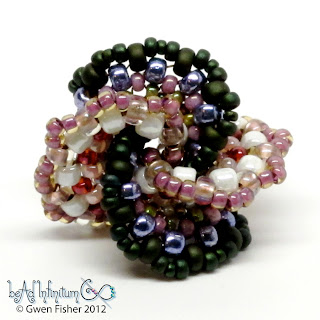
I'm still making Rainbow Twist beaded beads because I'm really liking playing with different color combos. This one is No. 11, and it's one of those color combinations that I like
to return to from time to time. This one started as all white, but I also used silver, and I fudged it a little more and
added a some lavender. It reminds me of snow crystals.
Here you can see the symmetry it exhibits from the side and how small it is.
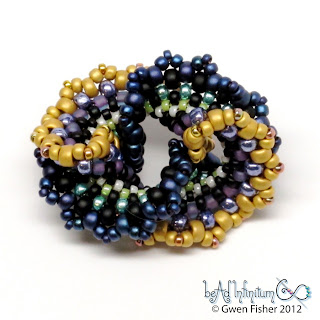
This one reminds me of spring flowers. I like the way it can be formed into a pinwheel design with 4 petals in two color schemes,
or you can reform it into something that looks like some weird sea creature. These beaded beads are for sale. Click the photos. Thanks for looking.
Last week, I shared instructions for how to make a Rainbow Twist beaded bead. I made them free, so if you haven't checked them out yet, you should go watch the video. I'm still making them, and I love that each one is a little different from the others.
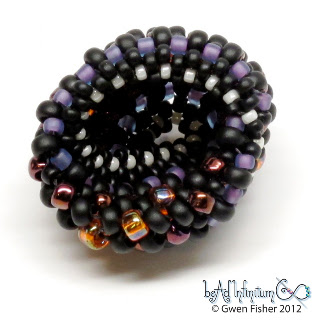
This one has extra rows to give a scalloped edge, and it has two full twists instead of one. It also has more repeats and the extra length makes it quite flexible and fun to play with. This beaded bead is for sale. Thanks for looking.
This piece is made from felt, and making this piece gave me many surprises. The image above shows that it has the chiral symmetry of a tetrahedron, but this isn't how I thought it would look before I made it. I made this object because a friend of friend asked if I could bead a version of the logo for Alximia winery, shown below. I decided to make one in felt instead because felt is so flexible, and I imagined that this particular link would be especially fun to play with if it were made from felt. And so it is.
Each component in the Alximia logo is supposed to represent one of the four alchemic elements: earth,
air, water and fire, and they suggested using some colors related to these. So I made earth brown, air blue, water green, and fire red. Green water? Anyway, moving on... To my great surprise, I found many different ways to arrange the four felt rings, shown in the Doceri drawing below. You can see the logo represented in the two photos on the top right (just below my signature). It has 3-fold symmetry.
We can see from the logo that it is an alternating link with 4 rings (components). (By alternating, I mean that if you follow the path of a ring, it weaves over, under, over, under, and so on around the other rings. You never get two overs in a row, or two unders.) But if you look at the photo on the far left of the picture above, below the words "chiral tetrahedral" you can see it's an alternating link in this arrangement too. This arrangement has 4-fold symmetry. These two different arrangements both show that the link is alternating. I wasn't expecting that. Cool.
This link has 12 crossings. Twelve crossings is a lot. Some link tables only go to 11. So I was having a hard time figuring out which link I had. But when I built the logo in felt, it turned into my old favorite, the four intersecting triangles. You might remember this beaded bead:
You can see it's the same mathematical object in the same orientation as in the largest (first) photo of the felt above. Well, almost, one is a reflection of the other. They are opposites. In other words, the felt piece and the beaded piece have opposite chiral symmetry, but otherwise, they are identical.
And the last surprise for this felted logo... If I pull hard, I can fit it over my hand and wear it on my wrist. I had no idea it was going to be a bracelet. Sometimes, you just get lucky. The felt bracelet is for sale. Click the photos.
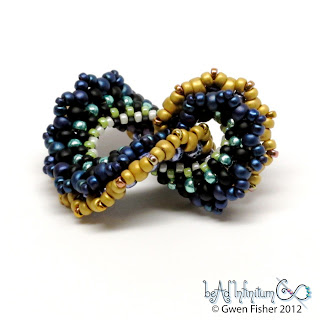
Like the beaded bead in my last post, this version here has 20 repeats instead of the 16 I describe in the Doceri video. It does not include the optional shared J bead. Leaving out the optional step makes it more flexible.
I just recorded a new Doceri video on how to make a Rainbow Twist beaded bead, but I'm offering you more than just a video.
Here is the Rainbow Twist as a PDF file. Below the video, I give you the script I used in the video, along with a Doceri drawing of each complete slide in my presentation. Doceri software allows me to be multimedia in all of these different ways, so I'm doing it. I have to admit that the teacher in me is pleased with so many delivery options.
And now for the lesson...
The Rainbow Twist: A beaded bead made with peyote stitch, by me, Gwen Fisher of
beAd Infinitum.This lesson is
made with Doceri software, which is the premier software suite for hand drawn
communication of all forms, designed specifically for teachers.
Here you can see three views of the rainbow twist.Although it might look huge on your
computer screen, its biggest length is just one inch, or 24 millimeters, so
about the size of a quarter dollar.It makes a cute little pendant, and if you’re so inclined to make a
matching pair, it’s even small enough for an earring.
The Rainbow Twist might look like a Mobius band, but
actually, it’s a little different.Like a Mobius band, it’s a strip with a twist, but this one has a full
twist and a Mobius band has only a half twist.You can tell by looking at the edges.When we trace out the edges, we can see
that there are two of them, and they cross each other twice.This shows that the rainbow twist has 2 edges and 2 faces.In contrast, a Mobius band only has one
edge and one face.
These are two more Rainbow Twists I made.
The one on the left has 10 different beads in it, and the one on the right uses just 6 different beads.You can make one with as few as 3
different beads, but in any case, you need seed beads in sizes 15, 11, and 8 to
make a Rainbow Twist.
In particular, the materials you need include 4 feet of
beading thread.
You’ll need size 15 seed beads in three colors.These itty bitty beads lie right in the
middle of the strip. There are size 11 seed beads in 4 colors, but I cheated and
just used three here because I didn’t have the right purple, so I used the pink
twice, and size 8 seed beads in 3 colors.These are the big ones on both edges.You also need a beading needle, or maybe two because we will
be working from both ends of the thread, but you can get by with one if you’d rather
thread your needle a couple extra times than get out of your chair.As my dad used to say, only you know
what’s best for you.
To start beading, pick up 32 size 15 seed beads, ABABABAB
and so on, until you have 16 pairs.
Pass through the first bead to make a loop, and then center the
beads on your thread.
For Step 1, use peyote stitch to add size 15 seed beads in
color C between the size 15 seed beads in color A.By “Peyote stitch” I just means that you pick up a bead, and
then sew through a bead, pick up a bead, and sew through a bead, pick up, sew
through, pick up, sew through, and so on.Notice we always skip the green beads and sew through the yellow beads. Go
all the way around like this until you get back to where you started.
In Step 2, you need to step up to the next round, and what I
mean by THIS is you just pass your needle through the next B bead, which gets
you ready to start the next row of peyote stitch.Normally the “step up” means that you sew through the first
bead in the last round you added, like the C bead, but this first time, things
sit better if you step up to the other side. It’s a tension thing.Just go through the B bead.Trust me.
For Step 3: Use peyote stitch to add size 11/0 seed beads in
color D between the size 15 seed beads in color B.Be sure to stop right before the last stitch. Notice how the
beadwork in this photo is lying in a flat circle, hence the name “circular
peyote stitch”.This is also
called tubular peyote stitch.Tubular, the Californian in me is pleased.
Now we need to add a twist.Here you can see a half twist.Notice that when I trace the edges, they cross each other
once.That’s how I know it’s a
half twist.If I joined the ends
this way, I’d have a mobius band.
But what I really want is a full twist, like in this second
photo.I can see it’s a full twist
because when I trace the edges, they cross each other two times.Also, the green beads match up with the
greens, and the oranges match up with the oranges.
So in Step 4, you twist the beaded ribbon 1 full twist, and you’ll
probably need to pass your needle through the hole in the center.Or maybe the tail end, depending upon
how you twist it. Now you can add the last D bead between the B beads, and
then step up by passing through a D bead.This is a normal step up.
For step 5, thread the tail end of your thread onto a second
needle.If you have a second
needle for this, you won’t have to thread any more needles.
Then step up through a size 15 seed bead in color C.Then peyote stitch by adding size 11
seed beads in color E between the size 15 seed beads in color C.Be sure to step up by passing through a size 11 E at the end
of the round.
Before doing Step 6, let’s look at what we have so far.We did rounds A and B together.Then added C to A,Then, D to B where we did the twist,
and then we added E to C.
Staying on the E side, now add F to E, which you can see here on the beadwork. More specifically, peyote stitch by adding size 11 seed
beads in color F between the size 11 seed beads in color E.Be sure to step up by passing through a
size 11 F at the end of the round. Continue using peyote stitch to add more rows to the edges
of the beads. Add G to D; H to G; I to F;
and J to both I and H.
Here are labels for the bead sizes.So, if you really understand how this
whole thing works, this chart is all you need to make rainbow twists.
There’s one optional step at the end, which is to make
exactly one J bead shared by both edges.I’m not sure exactly how I found the middle to make it symmetric, so I
can’t explain it to you.You’ll
just have to figure out that step for yourself, or leave it out entirely.You might not even want it there
anyway.
Step 7 is tightening the last row on each edge and then
tying off.That’s it, you’re done.
One last note on twist: On the left two pieces, you can see the twist has the same
handedness.Yarn spinners call
this S twist.
On the right is a Z twist.You can’t turn an S twist into a Z twist without cutting the
beaded bead or passing it into the fourth dimension, which is hard to do
without super powers.So if you’re
making a pair of earrings, you probably want to make one of each.Enjoy, and as always, if you make
something nifty, please show me what you make!Bye now.
 And here is a necklace that I made from 6-pointed stars in four sizes.
 I call the workshop the "Starburst Galaxy Made With Right Angle Weave." I call it a galaxy because you can make more than 20 different stars in different shapes and sizes, all with one combination of techniques. I'll show you more photos of the different stars you can make in the coming months as I assemble kits.