Tuesday, February 25, 2014

Math Cookies

We made math cookies!  More specifically, we formed mathematical objects out of shortbread and white chocolate. These photos show the combined confectionery efforts of Ruth Fisher, Andrea Hawksley, Vi Hart, and myself.  
Here you can see our set up.  We rolled out the colored shortbread dough using some plastic strips so that we would get a nice, evenly thick sheet of dough.  Here we are cutting (1 : root2) rhombuses with 60° rhombus holes.  We were able to cut the holes with that little metal cookie cutter, but we had to use a knife and straightedge to cut the larger rhombi.
With the little 60° rhombuses that were in the holes, we made a tiling.
Here's the shortbread tiling, before baking.
Shortbread tiling, after baking.
Can you guess what we made with the bigger rhombuses?
 Here you can see them being assembled on jig made from paper and tape.
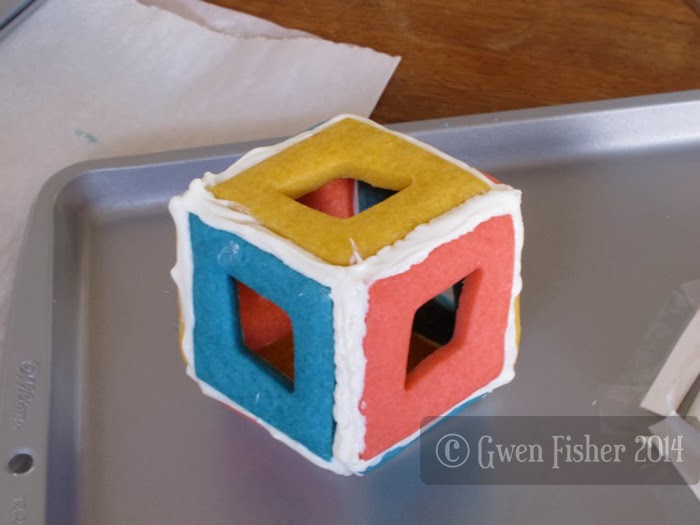
We made a rhombic dodecahedron, called that because it has 12 faces, each of which is a rhombus.
Here's the complete rhombic dodecahedron assembled with white chocolate.


Then we started assembling our blue hexagons.  Here's the jig for a truncated octahedron.
Here's the jig for a truncated icosahedron.
Here we are assembling the truncated icosahedron with melted white chocolate.

Here you can see all three of the truncated regular polyehedra we made.  Notice we just used one cookie cutter for all of these cookies, a hexagon. In fact, it was BECAUSE we had a hexagonal cookie cutter that we decided to make these particular shapes.         
Quasiperiodic cookies taste better than nonperiodic ones.  We had to make our own cookie cutters for this piece.  We made them out of paper and tape.  This is called a Penrose tiling.  We wanted to decorate it with white chocolate to show an isomorphic tiling on top, but we found an error.  To anybody else who can find the error, you will receive two points and a gold star.
This is a short braid made out of shortbread.
With the last bits of dough, we made lots of little tetrahedral cookies.

We assembled these tetrahedrons into second generation Sierpinski tetrahedral cookies with white chocolate. This actually worked better than I thought it would. Unfortunately, we ran out of dough before we could make the third generation. 
They were delicious.  Thanks for looking. 

Updates:
Vi Hart also created a video of our cookies making adventure.  She's a wonderful story teller, and among other things, she included my dog Walter's involvement in our day of making cookies.  Check it out. http://www.youtube.com/watch?v=_n1126GoxbU

We even made it on BoingBoing! http://boingboing.net/2014/03/04/cookie-geometry-with-vi-hart.html

Friday, February 21, 2014

Rainbow Mandala

I've been having fun beading rainbows lately.  Rainbows are all about color.  I call this piece a Wisdom Mandala.  It's a two-sided pendant.
Here you can see the other side of the rainbow... pendant. :)
At first, I thought I preferred the top photo, but then after I slept on it, I decided I liked the bottom photo better, but now I'm not so sure.  Which side do you prefer?
This pendant is for sale here: https://www.etsy.com/listing/179768812/
The pattern for the Wisdom Mandala is available here: http://www.beadinfinitum.com/Kits/index.html#Wisdom_Mandala.

Thanks for looking!

Monday, February 17, 2014

Rainbow DNA and Other Beaded Earrings

I've been beading DNA earrings lately.  For this pair, I went full rainbow.
Rainbow DNA Earrings
Double helix spirals. Here you can see the whole pair.
Rainbow DNA Earrings
The next pair is mostly bronze and other colors that are easy to wear.  The coloring of the base pairs of molecules uses the sequence recognized by the enzyme PmeI, which is found in the microorganism Pseudomonas mendocina. This is an environmental bacterium that can cause opportunistic nosocomial infections, that is, ones that are generally acquired in hospitals.
Beaded DNA Earrings
Here are some nice earthy colors.  The coloring of the base pairs in this pair (and the next) uses the sequence recognized by the enzyme SbfI, which is found in the microorganism Streptomyces sp. BF-61. Streptomyces is the largest antibiotic producing genus of bacteria, producing antibacterial, antifungal, anti-parasitic drugs.
Earthy Beaded DNA Earrings
These are teal and purple.
Teal DNA Earrings
I also made a pair of Lotus Drop Earrings in bronze and purple with a nice creamy pearl on each.
Lotus Drop Earrings
All of these earrings are for sale in my Etsy shop.  Click on the photos to see the listings.  Thanks for looking.

Tuesday, February 11, 2014

Wisdom Mandala Pendant Blue Lapis Cream Pearl

This pendant is a two-sided Wisdom Mandala, woven from hundreds of tiny seed beads and sparkling Swarovski crystals. I started with a big blue lapis bead and some pearls, and the rest of the beads just picked themselves. The palate is warm bronze and blues on one side, and silver and blue on the other. The very symmetric mandala hangs from a beaded tube that is large enough to accommodate a thick cord or chain.
Wisdom Mandala Pendant
The mandala is 43 mm point to point (1 3/4 inches). The complete pendant is 64 mm tall (2 1/2 inches).
Wisdom Mandala Pendant
The design is named for the Five Wisdoms in Buddhism. These include the bare non-conceptualizing awareness, mirror-like awareness, awareness of sameness, investigative awareness that perceives the specificity, and the awareness that spontaneously carries out all that has to be done for the welfare of beings, manifesting itself in all directions.
This Wisdom Mandala pendant is for sale in my Etsy shop.  If you would like to learn to make a pendant like this yourself, visit http://www.beadinfinitum.com/Kits/index.html#Wisdom_Mandala.

Thursday, February 6, 2014

TUTORIAL How to Make a Top Hat from Felted Wool Sweaters

https://www.etsy.com/listing/178289833/tutorial-top-hat-pattern-felted-wool
What do you make with old felted wool and cashmere sweaters? Try this DIY Do-it-yourself Top Hat. Learn to make this full-size, warm hat, a winter topper, so you can look dapper and still stay warm. The hat is fully lined so you’ll stay extra toasty while you look classy. The hat is constructed entirely by hand, without the use of a sewing machine. The PDF tutorial gives step-by-step instructions for drafting the pattern pieces in any hat size from adult XS to XL, preparing and cutting the fabric, constructing the hat, and hand stitching each seam with yarn. The tutorial ends with instructions for the optional felt flower.

Materials and Tools
1. Felted wool sweaters. Choose thicker sweaters (more than 1/8”) for a stiffer hat, and thinner than 1/8” for a softer, floppier hat. Use two sweaters, three if they are very small. The best choice is stiff, thick 100% wool for the most of the hat, and cashmere sweater for the lining. Soft Merino wool would be another good choice for the lining. That’s the part that touches your head, so the softer the better.
2. Thick thread or thin yarn: The stitching will show as a design element, so choose your color with that in mind. I use lace weight silk yarn, but any thin string or yarn would work. Your yarn is too thick if you have trouble pulling your needle through two layers of felt. If you want to use sewing thread, I recommend a heavy weight “quilting” cotton thread, doubled. You will only need a few dozen yards. So if you have yarn remnants, this is a great place to use them up.
3. Paper
4. Tape
5. Ruler
6. Pencil
7. Large eyed needle: long sharp needles work well, with an eye big enough for your thread
8. Regular sewing thread, whatever you have on hand that contrasts with the color of your hat. You will use this for the markings.
This pattern is suitable for advanced beginner sewers. Knowledge of sewing is helpful but not necessary. I assume you know the very basics of sewing (like threading needles and using scissors), but if you've never worked with felted wool sweaters before, this is a great place to start.
The tutorial is 17 pages, including 92 color illustrations and photographs that show how to complete each step. Two of the pages show how to make the flower, and the last two pages show photos of four different felt hats I’ve made with this pattern.
 If you're not the crafty type, and you'd like to purchase one of these hat, hand made by yours truly, check out the hat section in my Etsy shop.

Monday, February 3, 2014

Writing a Top Hat Tutorial

Ever since I took a course on costume construction at our local community college, I've been wanting to write a tutorial on how to make a top hat, but doing a traditional version using traditional techniques seemed like, well, old hat. 
 Felt Top Hat
Recently, I tried using one of my top hat patterns with old felted wool and cashmere sweaters. I gifted the first to a friend, kept the second for myself, and then there's the third one pictured here. I really love these hats. 
Felt Top Hat
Warm and fancy without being over the top (like, maybe, my fur hats with ears and horns). I've been taking careful notes of my process and drawing lots of little pictures. I typed up my notes, printed them out, and made another hat.  I've redrawn all of my little sketches at least once.  Now, I'm well on my way through a tutorial on how to draft a pattern and make top hats with felted wool and cashmere sweaters that will fit adult heads from XS to XL.
Felt Top Hat
If you like top hats, but aren't the crafty type, check out which hats I currently have for sale. If you are the crafty type, well, I hope you'll look out for my tutorial, so you can enjoy making and wearing these as much as I do. 
Cashmere Lining


Related Posts Plugin for WordPress, Blogger...